Monday 29 August 2011

Light Through the Day

  For this exercise I have set my camera in one position, and set it in aperture priority, on a timer so that it takes one frame every hour throughout the day, so that I can see how the sun moving across the sky affects the landscape. I have chosen a view which includes buildings and vegetation so that I can see how the moving light will affect each component of the landscape.

5A.M , 30 secs at f11
  In this first image taken at 5a.m you can see it is still completely dark with absolutely no light in the sky at all, hence the extremely long 30 second exposure.

6 A.M, 8 secs at f/11
  As you can see at 6a.m there is now light in the sky, but the sun is still below the hill in the background, hence there are no shadows and the whole picture seems rather flat with a very cool tone, the exposure is still very long, at 8 seconds.
 
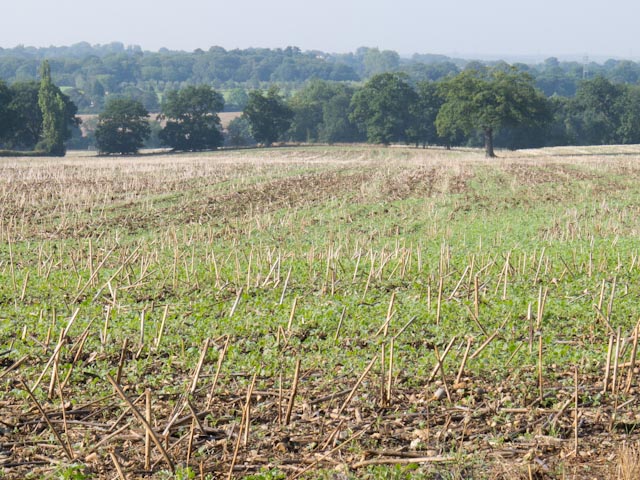
7 A.M, 1/20 sec at f/11
  At 7a.m the exposure is much shorter at 1/20 sec, the sun has now risen above the hills and is lighting the tops of the trees. The building is still in shade, the overall tone is still cool, and the image is still quite flat.

8 A.M, 1/180 sec at f/11
  It is hard to say what this picture would look like, as it appears that a cloud is shading this part of the scene, although it looks as though the sun is already fairly high.

9 A.M, 1/250 sec at f/11
  The sun is now giving some form to the landscape, in quite general terms,is it is showing there is a dip in front of the building or is that the shadow of the building.

10 A.M, 1/250 sec at f/11
  This the first point at which the scene appears fully lit, although I think the front of the building is just reflected light. The trees now appear fully formed and the shadows are not too hard.

11 A.M, 1/250 sec at f/11
 The sun is now high in the sky, the shadows are now directly under the trees and are now quite dark. The sun is still not directly lighting the front of the building.

Midday, 1/180 sec at f/11
  It is now midday and the sun is directly above, it is just striking the blinds on the front of the building, so we can expect the sun to set to the right of the scene. The light is now quite hard and colourless.
1 P.M, 1/125 sec at f/11
  As we can see more light is now striking the front of the building with what appears to be a hard white light, the shadows are already beginning to lengthen under the trees.

2 P.M, 1/125 sec at f/11
  The light seems ever so slightly warmer in this picture and there is a touch of colour in the sky.

3 P.M, 1/180 sec at f/11
 There is now a huge change from the previous picture, the sky is now blue and the light is definitely warmer, the shadows under the trees are showing the form of the terracing.

4 P.M, 1/180 sec at f/11
 The light is warmer still, and the shadows have further lengthened, these pictures are a vast improvement over the ones taken in the morning.

5P.M, 1/30 sec at f/11
  The sun has now started to disappear behind the hills facing the building and they are casting a shadow across the bottom of the picture. The light intensity has now dropped, the exposure time has dropped to 1/30 sec, the light is also much warmer and the colour is draining from the sky.

6 P.M, 6 secs at f/11
  The sun has now left the scene and it now almost completely resembles the picture taken at 7 a.m, there are no shadows and the exposure has lengthened to 6 secs.
  This exercise shows that throughout the day there is a very small window when the light is right in any given scene, the best picture in this sequence was taken at 4 p.m. At this time the light had its best colour, the scene was completely lit with a low raking light which helps to give form to the components of the landscape.


Judging Colour Temperature Part 2

  Here we are going to look at how changing white balance settings 'in camera' and after in processing software affects the colour temperature of the images. The first image below was taken in full mid day sun, and therefore its white balance is neutral and needs no adjustment as the cameras white balance was set to daylight, but it is dreadful light for portrait photography.

Mid Day Sun, WB Daylight
 As you can see because of the strong sunlight there are very strong shadows across the face, to make a decent portrait in this light you would either have to place the sun behind the subject or use flash or reflectors to fill in the shadows.
  The next image was taken in midday shade and gives a much better light for portraits, the white balance was still set to daylight and therefore it has a bluish colour caste.

Midday Shade, WB Daylight
  The next image is the same picture, but I have corrected the white balance by using the shade setting in Lightroom. This has given the picture a much more pleasant warm tone which suits the subject much better.
Midday Shade, WB Corrected
  As you can see it has given my wife back her tan, before settling on the shade setting in Lightroom I also tried the eyedropper tool on her white T shirt, but I felt it did not have enough effect.
   Next is another portrait taken in early evening which because of the lack of blue light has a nice warm tone which suits the subject well, after it is the same image corrected using the eyedropper tool.

Evening Light, WB Daylight
Evening Light, WB Corrected
  As you can see the difference in minimal and I think I prefer the slightly warmer tone of the uncorrected picture.
  The portrait below was taken in full midday sun with the cameras white balance set to daylight and so should be neutral.
Full Midday Sun, WB Daylight
  As we can see there is no colour caste but it suffers the same fate as the earlier midday portrait.
 The next image was taken in midday shade with cameras white balance now set to shade.

Midday Shade, WB Shade
  As you can see this has removed the cool blue caste of the earlier shade portrait, but it has not had has great an effect as the shade setting in Lightroom. But I think because of the younger subject this outcome is the best, also personally I do not like pictures that are too warm, although I think it was Terry O,Neill who said that he had never had any of his clients complain that his pictures were " too f**ing warm".
  The last picture was taken in quite warm evening light with the cameras white balance set to auto.

Warm Evening Light, WB Auto
  Using the auto white balance setting has not produced as warm toned an image as the picture of my wife above with the camera set to daylight, although this was the following evening with a much' redder' light.
  As we can see from this exercise there are many different ways of affecting white balance and they all have varying results, much is down to personal taste and the brief you have been set.


Wednesday 24 August 2011

Judging Colour Temperature Part 1

  For this exercise I had to take three pictures of the same subject under different lighting conditions, the first picture was taken in full sun at mid-day, the second was taken at the same time but in shade and the third was taken in evening sunlight. The idea of the exercise is to see if the difference in colour temperature is evident in the pictures, the mid-day light should be colourless, the shade should be blueish from the reflected light from the sky and the evening picture should be more red.
Full Mid-Day Sun
   In this series of pictures I have asked my wife to wear a white t-shirt in the hope that it would make any difference in colour temperature more obvious. As you can see in the picture above in full sun there is no colour caste in the image because the mid-day light has the full spectrum of colours that make up white light.

Mid -Day shade
  This picture was taken at the same time as the one above but in the shade, as you can see especially in the t shirt there is a definite cool tone. This is because, out of direct sunlight, the only light to reach the subject is reflected from the blue sky above.

Evening Light
  As you would expect in the evening the light has a definite warm tone, this is because as the sun gets lower to the horizon the blue part of the spectrum is filtered out by the increased amount of the atmosphere that the light has to travel through.
   One point to make is that although I have written about warm and cool tones, when it comes to colour temperatures it is the opposite to what you would imagine, blue light has the higher colour temperature and red the lower.


Tuesday 23 August 2011

Measuring Exposure part 2

   For this exercise I had to take a series of exposures based around the exposure that my cameras meter deemed correct and then decide which exposure I prefer.

Under Exposed by 1 Stop
Under Exposed by 1/2 Stop
Correct Exposure 
Over Exposed by 1/2 Stop
Over Exposed by 1 Stop
  In the above set of images of a Hydrangea flower the under exposed pictures are definitely too dark, the so called correct exposure has nice colour saturation, but is still a little to dark. I feel the 1/2 stop over exposed has just the right amount of brightness and saturation, any more exposure and the flower starts to lose texture.

Under Exposed by 1 Stop
Under Exposed by 1/2 Stop
Correct Exposure
Over Exposed 1/2 Stop
Over Exposed by 1 Stop
  In the series above although the under exposed pictures have greater saturation I feel that the higher exposure images suit the style of shallow depth of field picture. The flower centre is also much more colourful and the lighter petals draw your eye from the outside of the frame towards it.

Under Exposed by 1 Stop
Under Exposed by 1/2 Stop
Correct Exposure
Over Exposed by 1/2 Stop
Over Exposed by 1 Stop
  In this set of portrait photographs the under exposed images are too dark and the 1 stop over exposed is too light and has started to lose detail in the skin. The correct exposure has nice skin texture and the 1/2 stop over exposed has a good brightness to it, and because of this it is my favourite of the five exposures.

Under Exposed by 1 Stop
Under Exposed by 1/2 Stop
Correct Exposure
Over Exposed by 1/2 Stop
Over Exposed by 1 Stop
  As you can probably tell from the series above I am no landscape photographer, the 1 stop under exposed is too dark and has lost detail in the trees. The over exposed images suffer from burnt out and loss of detail in the lightest areas. Of the two pictures left I prefer the extra saturation of the slightly under exposed one.

Under Exposed by 1 Stop
Under Exposed by 1/2 Stop
Correct Exposure
Over Exposed by 1/2 Stop
Over Exposed by 1 Stop
 The three lighter exposures of the tree above suffer from major burn out and loss of detail in the sky. Of the two under exposed pictures I prefer the almost complete silhouette of the full stop under exposure.
   I think this exercise has been very interesting, in that, it shows there is no correct exposure for any subject, a lot is down to personal taste and what the original artistic intention was when the picture was taken.
  Deciding how I want the final picture to look at the moment of taking, exposure wise, and not leaving it to my cameras meter is obviously a skill I am going to work hard at to make it second nature.